We have written on this subject in the past. Here I will explain how and why I take the time in sizing the head correctly. Generally, we order a mannikin with the neck size very close to the size we need. I still adjust neck size, but find the the head width 85% of the time is incorrect. Here you can already see that the mannikin is wider than the skull. Most taxidermist cut the eye sockets off so they would not have a width measurement to reference.
The mannikin is 3/8 of an inch to wide on each side. This head needs to be reduced by 3/4 of an inch. Once you reduce the width by 3/4 of an inch, you have also reduce the circumference by 1 1/2 inches. Without this reduction, you would need to steal skin from some where. This is where achieving detail becomes impossible. Stop and learn to size the mannikin correctly. This will allow you to produce a more accurate mount. Once you master the craft, you will be able to get more money for the work you do.
Notice how wide the mannikin is at the back of the head. This is why you see deer with their ares pinned back. There was not enough skin to form correct ear butts and have the ears in a forward position.
Using the skull you can see that the bridge of the nose lines up with the mannikin. Without the bridge left on the skull, there is no way to line up the skull and antlers at the right angle. The taxidermist must just guess at the proper placement.
I measure the skull and find the width.
I have split the form down the center and reduce the width to match the skull. Remember, If you see the eye sockets cut off, that means that the taxidermist is not taking into consideration the head size. In my shop this is not acceptable.
Here I have adjust the width and now the skull fits perfect.
Notice the factory eye set. It also was incorrect for this deer. I need to make adjustments here as well.
Here the head has been foamed back in place and the skull screwed down tight. I will now foam the skull in and shape the foam around the skull.
Using foam will give you something to glue to. It also has adhesion properties to help keep the skull tight to the mannikin.
Here the eye is ready to be sculpted in place.
I have checked the skin for fit.
I will have enough skin to place everywhere it needs to be. I do not have to stretch and steal skin from other areas. The photo below shows the mount in a drying state. Eye angle is correct and the skin fits tight to the burr. Paying attention to detail will pay off in the long run.
Total Pageviews
Monday, April 18, 2011
Remounting a Dall Sheep
We will walk though the steps that I took to remove and remount this Dall sheep. This is another example of a case where skull width was not considered and multiplied into many more problems. There was a block of wood used as pedestal hardware. This is what held the sheep up as a pedestal. This is very poor craftsmanship. The area on the back was filled in like a rock. That also will go.
Looking from the front, the head is to wide and the muzzle has no detail. This is because the mannikin was to large and there was not enough skin to adjust and create the detail. Notice the ears are not even and are very poorly shaped. I found that one ear-liner was to large and had been folded over inside and left like that. The ear was not turned out all the way, and this became a problem with the fit.
Here I have been soaking the skin and removing it ever so slowly. I found even more problems as I removed the skin.
Looking close at the next few photos, there had been epoxy filled in between the skin and the horn. This is because the mannikin was to large and there was not enough skin to reach the horn. If this happens, it is because the head on the mannikin is to wide and needs to be split.
Notice where the hair was pushed in to the epoxy to fill the gap. This is where the problem should have been addressed to discover why things are not fitting properly. Attention to detail and solving these problems increases your skill. This is where you will earn more profit for the work being done.
Notice here that the mannikin is wider than the skull. This will cause problems with having enough skin to fit the mannikin properly. Here the head needs to be removed and split down the center to reduce the width.
Another look from the top. This is just unacceptable. There was no thought put in to this project.
Here it is noticeable that nothing lines up correctly. This is how problems begin. When the head is to large for the skin, you will begin to steal skin and placing it where it does not belong.
More epoxy. So the skin did not fit around the horn at any area. The circumference of the mannikin at the head was so large that there was not enough skin. In the tutorial Mule Deer Project, I show how the head needs to be cut and place back on the mannikin.
Placing the skin after all the alterations.
Notice here the skin fits around the horn base just as it should.
The muzzle width here was reduced and the skin can now fit the mannikin without drumming.
Here you can see the head beginning to take shape.
From this angle, you can really begin to see a difference in the detail and overall shape. Look back at the head we started with. There was nothing right about that head. Looking at the photo on the bottom, you can see separation between the bridge of the nose and the muzzle. This detail is important in achieving a life like look. Looking at the base of the horn, you can see the skin fits perfect up to the base. This skin now fits this sheep correctly.
Friday, April 1, 2011
Eland Project
We have posted on these problems in the past. This is another trophy mounted in Africa. This eland represents craftsmanship at its poorest. This was to be a pedestal mount. When it showed up from Africa, there was no base for it to set on. It only had a rusty old metal plate with screws that they must have found beside the road. The backing is black felt. It was glued to the back and looked like a child had done it.
Here are large pin holes in the skin that added to the poor quality of the mount. We find more and more problems as we move forward.
Here is the felt being removed. The white lines are hot glue used to hold the felt in place. This is why the cost of getting trophies mounted in Africa seems to be less expensive. The truth is, the craftsmanship is very poor. There is nothing cheap about it. When the daily rate and trophy fees are considered, this is not a bargain.
Here we are removing the skin on the back. Notice it was sewn down the middle and then felt glued over that. We will now reshape the back for a more desirable look.
This form material was the worst foam we have ever seen. It was very soft in spots and other spots where rotten and old.
Notice here eye set was not even considered. Nothing about this mount is correct.
Around the eyes it was just painted black. There was no artistic imagination used in the detailing of this trophy Eland. Body color was wrong and it was just a mess.

Here the back has been remodeled and a nice piece of creme colored buckskin added to cover the back. We also added a rope braid for some texture. Then the Eland was completely painted to take out all the dark spots in the skin that were showing from the poor tanning this skin had gone though. Adding some habitat helped to hide those lager pin holes we had tried to cover.
Here the Eland was placed on a cabinet that the client had made by a local cabinet shop.. The cabinet was not top quality either. By this time the client had spent more money at this point than he would have if he had the mounts done in the states. There is no deal in Africa. The mounts done in Africa are mounted by the local staff. These are the same local people used for other labor jobs. The trophies are not mounted by professionals. Do some homework before making the mistake thinking that there is money being saved.
The finished Eland looks much better. It is far from being good.
Here are large pin holes in the skin that added to the poor quality of the mount. We find more and more problems as we move forward.
Here is the felt being removed. The white lines are hot glue used to hold the felt in place. This is why the cost of getting trophies mounted in Africa seems to be less expensive. The truth is, the craftsmanship is very poor. There is nothing cheap about it. When the daily rate and trophy fees are considered, this is not a bargain.
Here we are removing the skin on the back. Notice it was sewn down the middle and then felt glued over that. We will now reshape the back for a more desirable look.
This form material was the worst foam we have ever seen. It was very soft in spots and other spots where rotten and old.
Notice here eye set was not even considered. Nothing about this mount is correct.
Around the eyes it was just painted black. There was no artistic imagination used in the detailing of this trophy Eland. Body color was wrong and it was just a mess.
Here the back has been remodeled and a nice piece of creme colored buckskin added to cover the back. We also added a rope braid for some texture. Then the Eland was completely painted to take out all the dark spots in the skin that were showing from the poor tanning this skin had gone though. Adding some habitat helped to hide those lager pin holes we had tried to cover.
Here the Eland was placed on a cabinet that the client had made by a local cabinet shop.. The cabinet was not top quality either. By this time the client had spent more money at this point than he would have if he had the mounts done in the states. There is no deal in Africa. The mounts done in Africa are mounted by the local staff. These are the same local people used for other labor jobs. The trophies are not mounted by professionals. Do some homework before making the mistake thinking that there is money being saved.
The finished Eland looks much better. It is far from being good.
Thursday, March 31, 2011
Remounting a Blacktail Deer
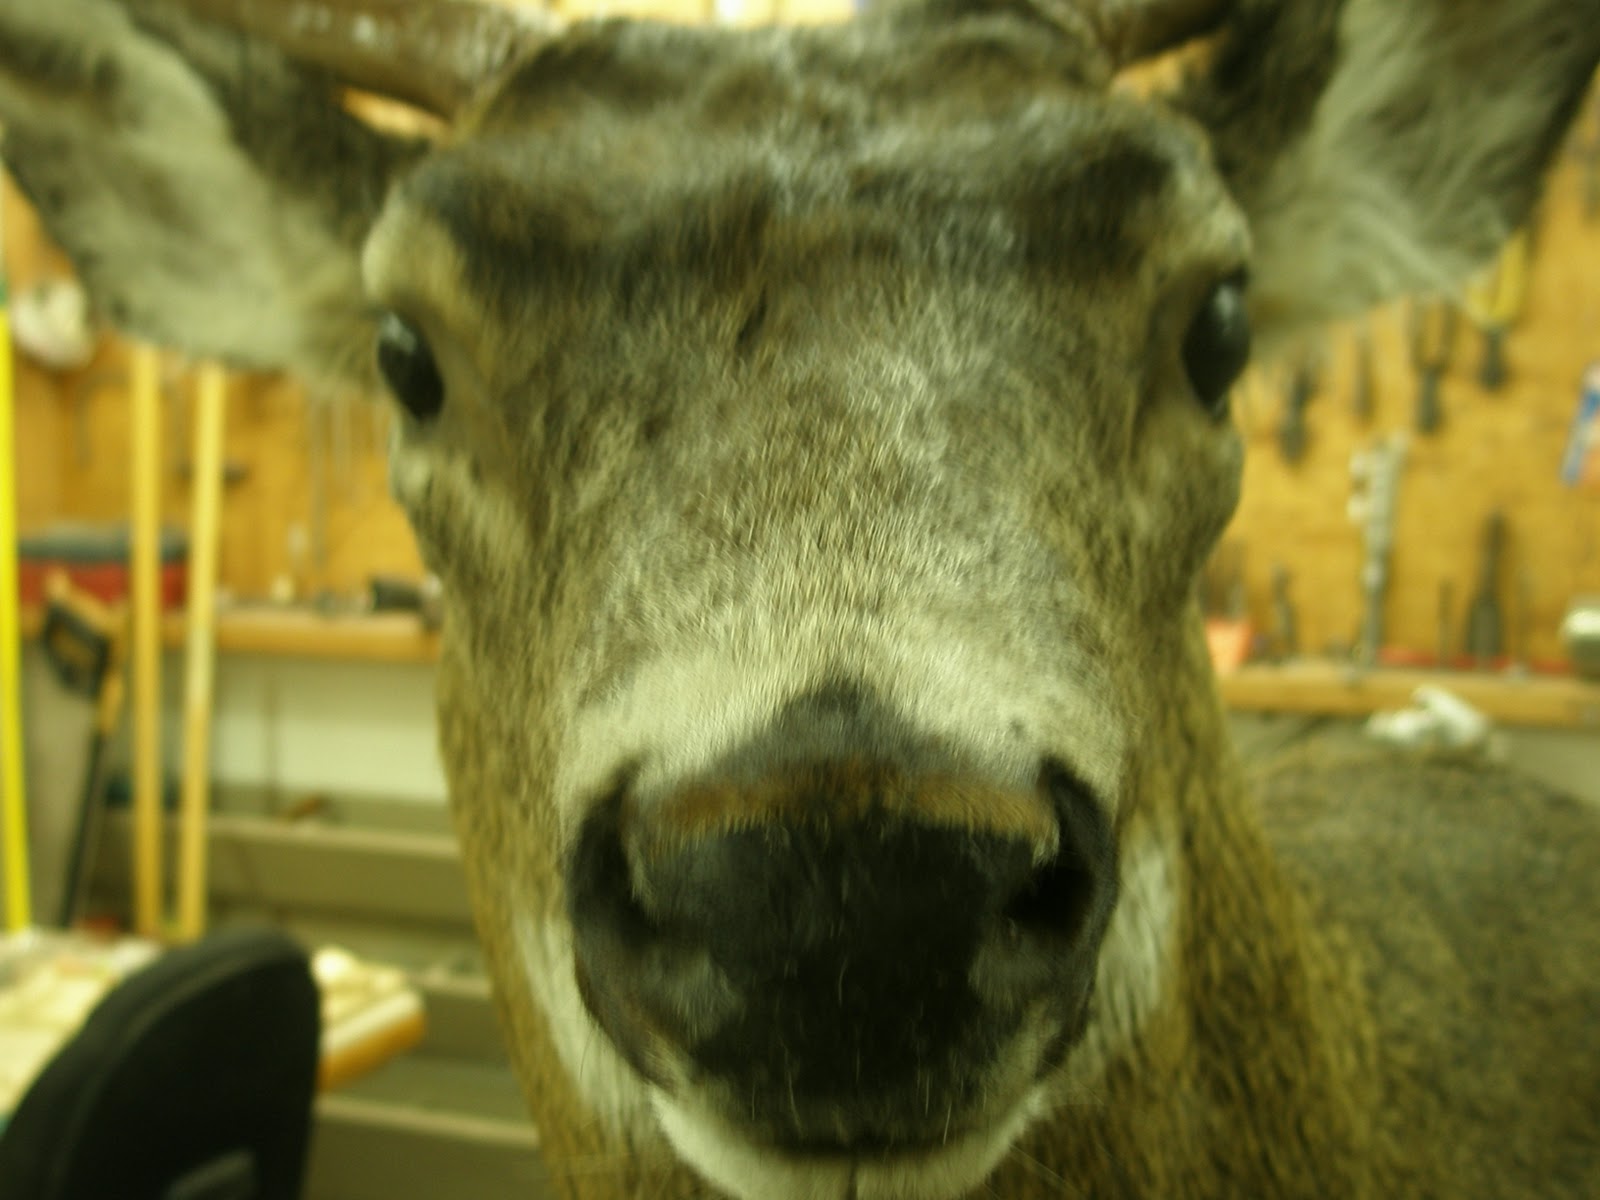
Notice here the eye set is very distorted. The eye was not sculpted in correctly in the beginning. This issue is cause by a number of problems I will show as we proceed.
Here from the front the nose is to wide. It was this way on the mannikin in the beginning. The head on this mannikin is to large for this deer. I measure across the eye sockets to get the exact width.
Here the ear looks very ruff and ungroomed. There has been no ear butt sculpted into the mount. I found the ear was just stuffed with clay and left as is. This is just very poor execution.
Here see another look at the other ear. No ear butt at all. There was no skin left to make an ear butt. The skin was used up because the head was to large. When the mannikin is to large, artist will begin to steal skin. Down the line it will show.
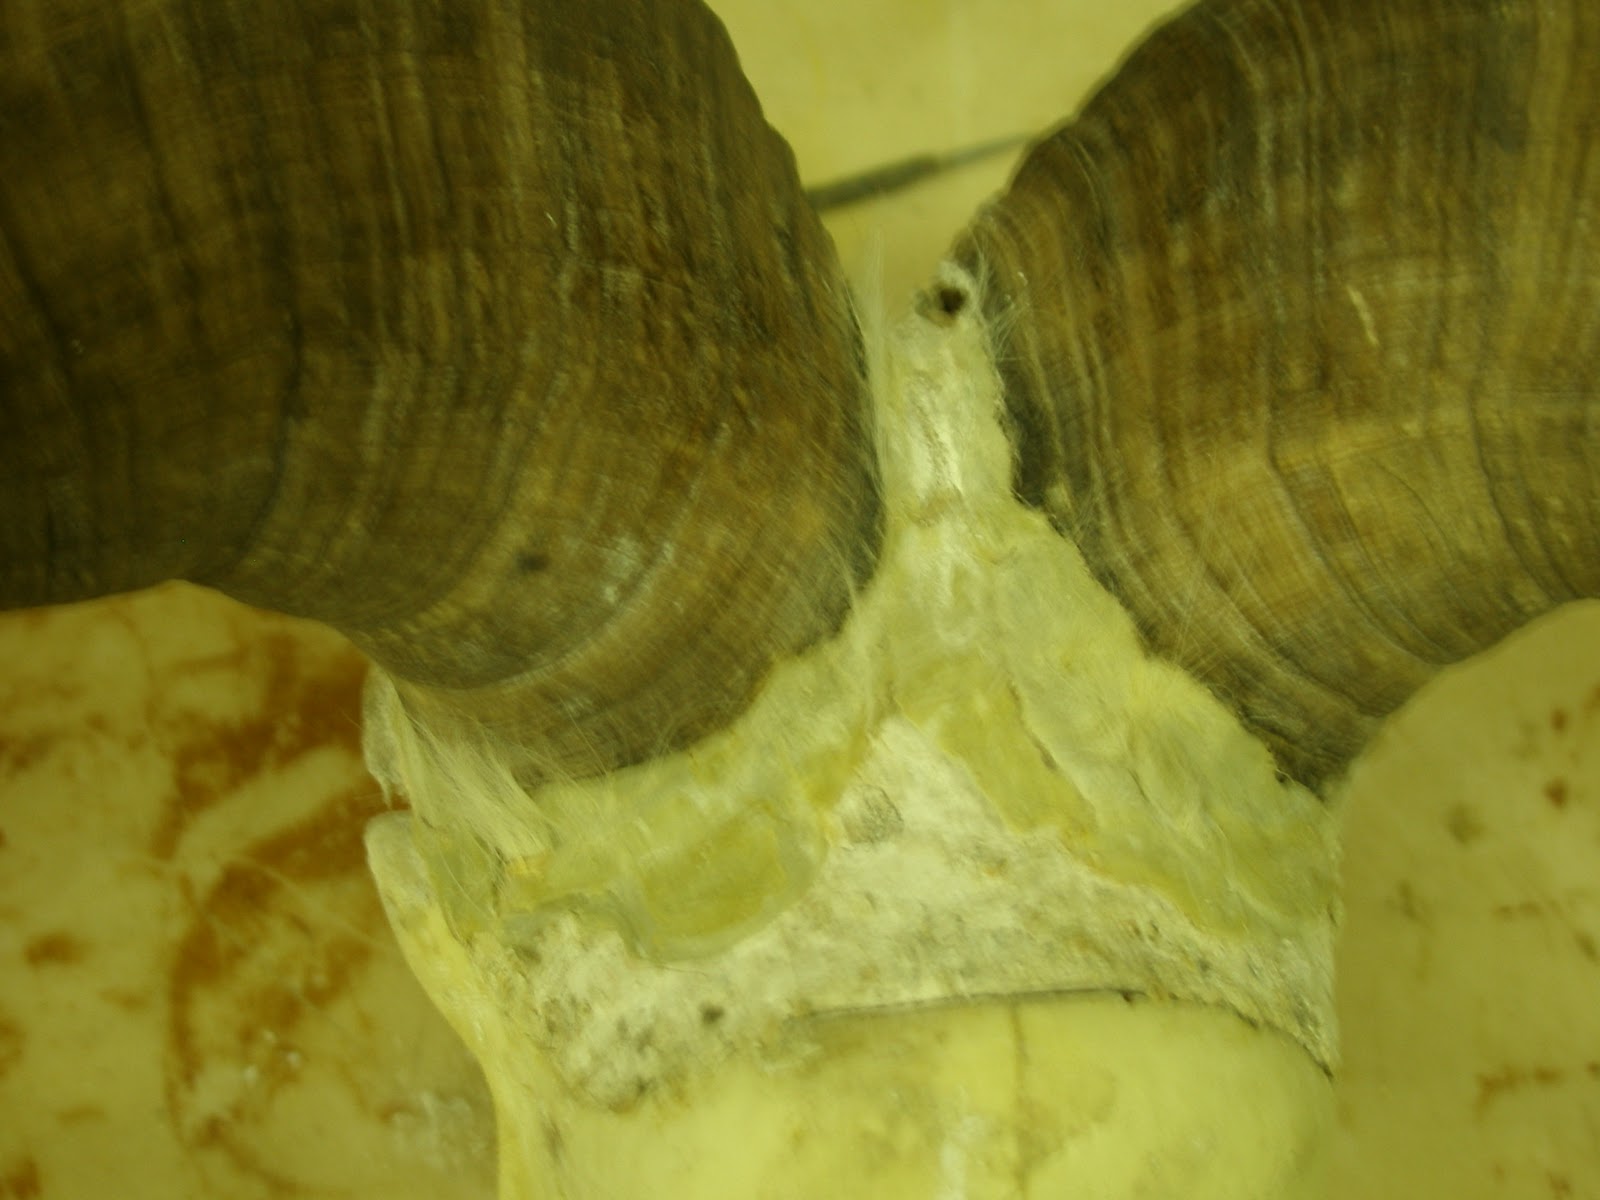
Now for the next problem. Here the skull was placed on the mannikin incorrectly.
After removing the skin, I can see that the skull was screwed flat to the top of the mannikin. The back of the skull should have been blocked up so the bridge of the nose lines up with the mannikin.
All this clay added to the distortion and just made the project more problematic.
Now we see how wide the head of the mannikin was to start with. The skull (eye sockets) is 5/8 of an inch narrower on each side than the form. The head should have been split and reduced by 1 1/4 inches. This is why the skin could not have been placed correctly.
Here I have removed the skin from the mannikin. I then removed the earliners, glue and unwanted clay.
I removed the head from the mannikin and reduced the width by 1 1/4 of an inch.
After splitting the head, I foamed it back together and reattached it to the mannikin. I use foam for all these steps. I do not use bondo, because the foam is stronger and will take the shock of being dropped.
Now here is the skull attached to the mannikin. Notice, that it lines up with the bridge of the nose. The mannikin is now the same width as the skull. I always leave the eye sockets on the skull when I cape out the game heads. The skull is the most important part of the mount. Without the eye sockets, the taxidermist is just guessing at the width, in fact the width is not even taken into consideration.
Here is the Blacktail mounted and on the wall to dry. The difference is unbelievable, and he is not detailed yet.
Here is the finished trophy. This is what the client was looking for.
Subscribe to:
Posts (Atom)