In this tutorial we will be remounting a Zebra that was mounted in South Africa. There is a lot of problems with this trophy, and we will reveal them as we move forward. This Zebra was brought to us by a hunter that was very disappointed when he removed his trophy from the shipping crate. Nothing about this Zebra is correct. I would say that the low price and the encouragement by his outfitter convinced the hunter it would be a good idea. It was only good for the outfitter, who received his 15% kick back. The taxidermist that the hunter had been introduced to, was never going to mount this trophy himself. The white African has his Blacks do all the work. They are not skilled craftsmen, and this is just another example. I mention these facts so future hunters would at least spend some time doing research among taxidermist in their home town or even well known out of town Taxidermy shops.

Having trophies mounted in Africa is always a disappointing proposition. If you are a hunter that has trophies at this time and think you like what you received, you have just settled for less. More than likely, with close inspection you will see unsightly stitching, improper skin placement, and lack of detail.
The ear placement on this Zebra in incorrect. With a little research on the internet, there are some great references. The body symmetry and head size is where the problems begin.
In this photo, the hunter has shown us the unacceptable sewing that was preformed on this trophy. When this Zebra was skinned in South Africa, the blacks did a very poor job. They should have kept the incision close to the main where the stitch could have been hidden. Once it was at the taxidermist, the blacks there still did not fix the problem, but just quickly stitched it up and out it went.
Once they began to detail this trophy, they felt that filling in the gap from the open stitch was a good idea. This is unacceptable and just shows the disregard for the hunters trophies in Africa.
Here; there is a hazy look in the eye of this zebra. It looks dirty, or possibly tarnished. I tried to clean the eye with solvent, but it still had a hazy dirty look to it.
Here it is easy to see there is no paint detail at all. This eye looks lifeless.
I have began removing the skin from the mannikin. This was a big mess. There was no rhyme or reason behind the thought process when mounting this trophy.
This here is the ear. I have began removing the plaster based product that was used to build an earliner. The taxidermist did not remove the ear cartilage, so this increases the ear thickness when the earliner is installed. Removing the ear cartilage allows the skin the be taxied on the earliner, producing an extremely detailed ear. Leaving the cartilage in makes the job faster, but is incorrect and cheap. These are just short cuts being preformed at a discounted rate.

Remember the eyes and the problems I was having. Once I removed the skin, I could get at the eye. What I found was; they were plastic. Yes; they were plastic. I cut this one eye in half on the band saw. Try that with a premium glass eye. Again more short cuts to save money. These are the things they do not tell you. Besides that you are in the USA, what are you going to do. This is just wrong. The hunter can avoid these problems, but by the time the hunt is ending, the money begins to dry up. So, at the end the hunter ends up with junk on his wall, and the outfitter does not care.
Here I have the skin removed, and cleaned up. I can now remove the ear cartilages and begin the shaving process so the skin can be taxied correctly in to place.
Here in our shop we have many Zebra skulls. So after measuring the width, I found that the mannikin used on this Zebra was 1 1/2 inched to wide. That is huge. That means I would need an extra 3 inches of skin for this to fit the original mannikin. Head width never came into there thought process. Why would it; there has not been any thought put into this mount yet. The hunters also never researched for a qualified Taxidermist prior to going on the hunt. Leaving these arrangements until last will always yield poor judgement.

The above photo shows the skull to be 7 1/2 inches wide. The mannikin they used was 9 inches wide. It is hard to see the width measurements in the photo. The head width is the most important part of the alteration to the mannikin. This is also true when it comes to our big game here in the states. Most taxidermist do not pay attention to these measurements. The taxidermy industry has avoided this part of importance when talking about the mannikins. The industry targets the hunter to mount his own trophies. If they were to discuss alteration, most hunters would not take on the task of mounting there own trophies.
The hunters are trying to mount heads that normally would not be mounted. This means that the industry would not be selling supplies for that project. These heads are generally small and not large enough to take to a taxidermist. Targeting the hunter, will sell more supplies, and the hunter has no chance of mounting this head because nothing will fit as he has been told.
Here is the mannikin that I will be using for this Zebra Pedestal. As you can see, this mannikin came with rods installed. This was a mistake that the supplier made and then would not take care of the problem. There should NEVER be rods installed into any mannikin for any reason. The industry targets the hunter as there customer, and not the full time taxidermist. This is what makes taxidermy for the beginner so difficult today. They want the hunter to believe that there is no alteration needed, and the skin will just go right on the mannikin.
With a saw I sliced down both sides of the rods and pulled them out. Now I can use the original hardware that was used in the beginning. Now this mount will still fit on the client original cabinet.
With the rods out, I can make the cuts need to size the mannikin for this skin. I will size the head first off of the original skull. Then the neck and shoulders are next. Once the mannikin has been altered for size, and can make the final alteration for direction.
From the side here cuts from the alteration are visual. I did not have all the skin that I would have liked to have. This made extra work to fit the skin properly. With a few cuts and 3 1/2 hours later, the skin is fitting like it should. This extra time made all the difference in the fit of the skin.
After preparing the head, the skin was ready to go in place. With the earliners glued in, I removed a round section of foam where the ear butt could settle into place. The nob that stuck out on the mannikin was removed, and a con-caved area was created to receive the ear butt. I then began placing the skin, and started the sewing. As I sewed the skin, I used a 2-part epoxy to glue down the stitches so there would not be an unsightly gap. This is one area that was incorrect the first time it was mounted.
Alteration is the key to a skin fitting a mannikin correctly. For those of you who have ever had to try stretch the skin, you know that the finished mount is never perfect. In fact, most of the time the taxidermist is just hoping the client just picks it up and pays the bill. This is no way to preform the art of taxidermy, or treat the client. Stop guessing and learn how to alter the mannikin. The client will pay you for your time and he will return with more work.
This is the epoxy is the same adhesive I use for the ears. I always use this to glue down my stitches. Using the epoxy under the stitch guarantees the stitch will never come open. The glue also gives me the ability to taxi the skin into place.
In this photo I have finished the sewing and will begin to set the eyes. I have carded the mane in place. The client was very disappointed in the attempt by the first taxidermist when it came to the mane. The mane looked like a bad hair day. I have groomed the mane into place for a neat natural look.
Everything is set and pinned in place. I will let it dry for around two weeks, and then start the detail. Here is where the Zebra will come alive.
Here is a photo from the front. Compared to the photo below of what I started with. There is a large difference between the before and after photo. Once the Zebra is finished, It will be remarkable.
This was mounted in Africa. The skin was tanned by the taxidermist on site. I found the tanning to be very hard to work with. There no no stretch or forgiveness. This had differently added to the outcome of the end result. The skin was still very thick and needed to be shaved down before it was manageable. The skin had been shaved in the beginning, but there were thick and thin spots throughout the skin. This made it very inconsistent.
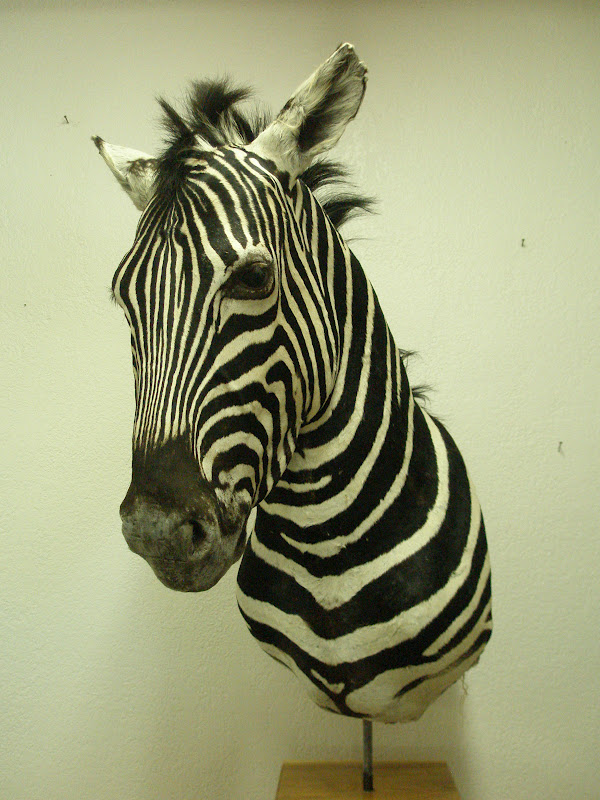
Here is a photo of the finished piece. Correcting the ear position began to change the features and gave it that Zebra look.
Here is a close up of the eye. Head width played a large part in being able to taxi the skin in to position. This head was 1 1/2 inches to wide . This is over 3 inches in circumference. This is the reason I try to drive home the importance of head width.
Eye set is important, but can not be achieved if the skin is being used in other areas. Anytime the mannikin is to large, the taxidermist will struggle and end up with a piece that shows all the flaws.
Ears on a Zebra work in together. That is not to say they can not work independently, but Zebra tend to move their ears in the same direction at the same time.
Here is the back of the pedestal. The client had some small pieces left over from the back skin. There was just enough skin to cover the back. This pattern I used is interesting and it draws your eye to the center. This make the seam down the middle acceptable to look at.
After all the detail, the change is dramatic to say the least.
I have used the same base that came from Africa. The craftsmanship here was poor with no attention to detail. I put a good coat of wax on the cabinet and that seemed to help its appearance.
The finished Zebra. There was a lot of man hours into this piece. There never is any profit in remounting trophies. There is only the experience learned from taking these pieces apart to find the problem. The problem is the same every time. The mannikins a always the wrong size, and the head is always to wide. I took the measurements from the skull, and the skull never lies. Pay attention to the head width, and stop relying on the mannikin to be correct. The mannikins are never correct for the piece you are doing.
We have more videos in the working, and will be on the blog soon.


 Recently I received into my shop a European Wolf that had been mounted
as a rug mount. We rarely take in Wolves from Russia. This is only the
fifth European Wolf that has came to my shop in the past 37 years.
This wolf here is a little different. It was already mounted in the
Ukraine. The tanning was done very well, but the taxidermist struggled
in the mounting process. From what I could see, they are most likely
limited to the taxidermy supplies available in Ukraine. I found it very
interesting to see the way this wolf mannikin was constructed. They
had used the original skull as the base and began modeling foam around
it. If this taxidermist had good quality supplies available, I believe
he could have put together an outstanding mount. This was not the
case, and the client decided that we needed to take it apart and start
over. I will walk though the steps taken to remount this European
Wolf.
Recently I received into my shop a European Wolf that had been mounted
as a rug mount. We rarely take in Wolves from Russia. This is only the
fifth European Wolf that has came to my shop in the past 37 years.
This wolf here is a little different. It was already mounted in the
Ukraine. The tanning was done very well, but the taxidermist struggled
in the mounting process. From what I could see, they are most likely
limited to the taxidermy supplies available in Ukraine. I found it very
interesting to see the way this wolf mannikin was constructed. They
had used the original skull as the base and began modeling foam around
it. If this taxidermist had good quality supplies available, I believe
he could have put together an outstanding mount. This was not the
case, and the client decided that we needed to take it apart and start
over. I will walk though the steps taken to remount this European
Wolf. 


