 |
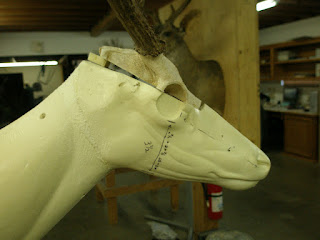
I believe we have all seen those YouTube videos where the eye sockets are no longer on the skull because the person doing the mount has removed that portion of the skull. I have mentioned before about how important this part of the skull is. Without these measurements, altering the mannikin becomes impossible. Most taxidermist/hobbyist do not plan on altering anything. This deer here has two specific issues that need to be addressed. First, this deer is 3 1/2 years old. The form that would normally be ordered, would be sculpted from a mature deer in the 5 1/2 - 6 1/2 year old class. Head width and head depth will need to be altered for a perfect fit. This is another place where the taxidermist/hobbyist can just stretch it to fit. They will save time not altering the mannikin. The mount will have a bug-eyed look that is unrealistic and unacceptable. This skull is 4 7/8 inches wide. The mannikin is 5 3/8 inches wide. This also means that the head depth is also to deep. We need to alter for size.
Here I have measured across the skull and found the width measurement. The head width here is to wide and needs to be reduced in width.
Here this photo shows that the neck is 2 inches to big. I will be removing the head from the mannikin and then removing the neck portion from the shoulders.
Looking closer, I have taken the measurements where the reduction will take place. Once the head and neck are removed, I will be able to reduce to the size needed.
This photo here shows the reduction I will be making. There is a formula for the resizing of this head. It must be kept proportional to the species I am working on. The depth of the head is figured in this manner. 1/2 of A-B plus 1/2 inch. In other world, if eye to nose is 7 inches, half is 3 1/2 plus 1/2 inch. The head depth of this deer with a 7inch eye to nose measurement would be 4 inches from the bottom of the eye socket to the bottom of the jaw line. This head was 4/8 of an inch to wide, and the head depth was 5/8 of an inch to deep. That does not sound like much. In reality, this makes the circumference 2 1/4 inches to big around. That is more than 10%. The finished head circumference is less than 17 1/2 inches. That is why most deer look bug-eyed.
Here the pieces are separated and ready for sizing. We talked about the difference between a museum quality and show quality mount. It is the amount of time and detail put into the mount. Our museum mount is a $600.00 piece. I do not alter those mounts. I get a form that is close, and go with it. There is no money or time to detail those heads. Our show quality mount is $850.00 and each piece will be altered to perfection. Remember, not every taxidermy/hobbyist could even create a show quality mount. Generally, those taxidermy/hobbyist are in the $500.00 range.
See here the head is split. I will then split the neck and start reducing it's size.
Here I have screwed the mannikin back together and I also have a chance the reattach the head at the angle that I will need it to be. I will test fit the skin at this point and make any necessary adjustments.
Just quickly pinning the skin in place, it now look like the fit is getting closer.
I am reattaching the head, and still finding some spots will need more attention.
I will be using the top portion of the skull. The top portion of the mannikin has been removed so that I can place the skull in that area. I do not use the two or three finger method of placing the skull on the mannikin. The first time I heard about this method, I was reading on a taxidermy forum. This is a very poor way to set a skull and the outcome is even worst. The industry has spent large amounts of money promoting quick set eyes and other fast get it done methods. They want the skull butted up against the back of the form. They do not take into consideration the age of a deer, nor the genetics.
Here is where the face begins to take on the narrow look that most all deer have. They have this look because of the proportion and symmetry. Symmetry is the balance of form and proportion. Without this, there is no profit..
Earliners are made and ready to install once all the alteration is complete.
This is an early season deer taken here in the bow season. These deer are thin haired and need to be handled very gently. My stitches are less than 1/8 inch apart. I also glue down the skin/stitch with epoxy. Once glued and taxied in to position, when the epoxy dries the seem will never come open. Once again as in all my tutorials; These steps can be over looked to save money and time. To you hunters; most of the time they are over looked, and you saved money.
This deer will now go though a drying stage, and then the detail will begin. I hope that this tutorial has shed some light on how important it is to learn the art of alteration. Once the art of alteration and symmetry is learned, the trophies will begin to look life like. Watch for our classes in 2013. We have been invited to do three seminars on the east coast this year. There will be one in Wisconsin, Virgina, and Atlanta Georgia. Watch for dates and times. These seminars will be videoed and be here on our website.


No comments:
Post a Comment